
Geocoding is a method of deriving spatial coordinates for tabular data stored in an addressable form. A manual equivalent is using pushpins to highlight locations on a map. GIS applications utilize an algorithmic matching method to automate attached latitude and longitude coordinates to addresses.
The most common type of geocoding results from the spatial location of street addresses using a street centerline file. In fact, tabular data listed by address is actually the most common way geographic databases are stored.
What is a geocodable file?
A geocodable file is a geodatabase that contains the prerequisite stored information within the attributes that will allow for locations to be derived from a tabular database.
Depending on the type of geocoding, the amount of information needed varies. Geocoding by ZIP code only requires one field of information: zipcode.
Street addressing tends to have the most amount of information required. At a minimum four fields are needed for each street segment: the starting address on the left side of the street, ending addressing on the left side of the street, starting address on the right side of the street and ending address on the right side of the street.
When an individual street address is geocoded, the GIS software application takes the address range information from the street centerline file and determines a what point proportionally along that street segment the point fits mathematically. (Related: How to Geocode Addresses Using QGIS)
Geocoding in ArcView 3.x
In order to geocode a tabular database in ArcView 3.x, two files are needed. The first is a geocodable spatial database as defined previously. The second is the file to be geocoded.
Unlike the geocodable database, the tabular address base needs to contain the addresses in one file. The following are step-by-step instructions on geocoding using a street centerline file. The data is from sample data provided by Esri and is of Redlands, California.
Loading in the street centerline file
Setting the geocoding properties in ArcView 3.x
Before you can geocode, you need to set up the geocoding properties. This means setting the fields that will be used to geocode. Make sure the street file is active and select Theme à Properties.
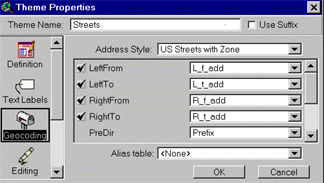
This will bring up the theme properties GUI (see below). GUI stands for graphic user interface and is the window that pops up. Select the geocoding properties (the icon is a mailbox).
You’ll notice that ArcView tries to automatically determine which fields are the geocoding fields. Scroll up and down to check out the fields. The ones with the check boxes are the required fields.
The default set for this shapefile is US Streets with Zone. This means that addresses are located using both the street range information, street name as well as an additional tie-in called zone. In this case, the zone information is the zipcodes. This extra designation is useful when locating addresses that have the same address (how many 100 Main St do you think are in the United States?).
When an address is identical, the correct location will be found using the ZIP code designation.
Look over the other fields. This should seem familiar now based on the previous section.
There are the four address range fields designating the starting and ending addresses for both sides of the streets. There is also a required field for the name of the street. This field only contains the name without any of the descriptors (e.g. N Main St is represented only by Main).
The descriptors are contained in four separate fields: a prefix, suffix, pretype and street type field. The prefix and suffix fields contain the directional descriptors (N, S, E, W). The pretype and street type fields contain the street type descriptors: Ave, St, etc.
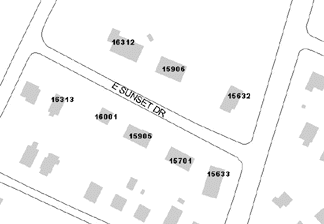
| L_F_ADD | L_T_ADD | R_F_ADD | R_T_ADD | PREFIX | NAME | TYPE | SUFFIX | ZIPL | ZIPR |
| 15633 | 16313 | 15632 | 16312 | E | SUNSET | DR | N | 92373 | 92373 |
The table above shows how the geocoding portion of the attribute table looks for the street centerline file. Visually the information contained in the table above looks like the image below:
Building the geocoding index
Once the correct fields for geocoding have been identified click okay. You will be asked if you want to build a geocoding index. Click yes.
Now when you go to View à Geocode address this option will be bolded. If you check the directory where the street centerline is stored, you will also notice that geocoding indexes have been added.
As long as these files are there, ArcView will recognize the geocoding properties of the theme. The extension of these files varies depending on the type of theme or coverage.
Adding in the tabular address database
Load in the tabular database. In this example I will load in a .dbf file containing fictitious customer names that I want to find where they are located within the City of Redlands.
This is a very simple file containing only the customer name, street address and city. Only one file is needed to geocode: the address field. However, the geocoding process in ArcView carries over all fields found in the tabular database.

Start the geocoding process in ArcView 3.x
Go back to the View to start the geocoding process. Go to View à Geocode Addresses…This brings up the Geocode Addresses GUI.
The reference theme is the geocoding theme that you are using. In this example it is the street centerline file. The most important item to check is the Address Style. You have a last minute option to change the this style from this GUI.
The address table is the tabular data you want to geocode. In this example the table is customer.dbf which is the customer database. Address field is the field containing the street addresses of the customers.
The display field is the field that will be displayed when analyzing entries that have more than one potential match. This is to help you determine a best match from the possible options.
The offset field allows you to place the locator point a specified distance from the street centerline and is based on whether the point falls on the left or right side of the street. The units are based on the designated units of the view.
What are aliases in geocoding?
Aliases are additional tabular databases that allow for landmarks and other common places to link to their perspective addresses. Therefore an alias table will have two fields: the landmark name and the street address:
| Police Headquarters | 43 Fountain Ave |
| Central Library | 21564 Montana Blvd |
Designate the file directory where you would like the newly created geocoded shapefile to be stored. The default is the temp directory for ArcView.
Before you start the geocoding process the last properties to set up are the geocoding preferences. This GUI allows you to set up the spelling sensitivity and minimum scores needed to determine candidacy of addresses.
Click on Batch Match to start geocoding. Once the geocoding has been performed you will get a results GUI indicating the number of records successfully matched versus unmatched.
You can go back through the unmatched records to try and find the correct street addresses by choosing the interactive re-match button.
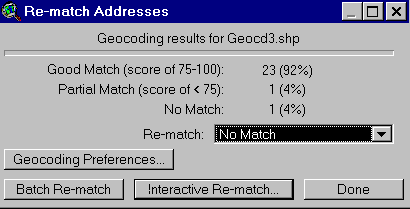
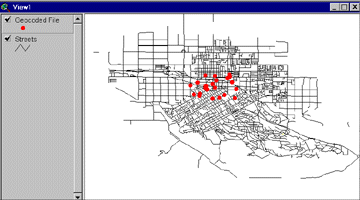
Once you are satisfied with the results click done on the Re-match GUI. You will see in the legend part of the view the geocoded file. Turn it on to see the spatial results of your database.
what is different between geocoding in arcgis and mapinfo software. which software is very good in it application. what special this geocoding & it can be used in analysis or not.