
In a world of ever increasing cyber threats and complications, on occasion, the need arises to take digital mapping away from a cloud environment. The cloud environment is a great solution for solving large digital mapping problems. However, a simpler, local solution is now available for smaller sets of data. In this article I will lay out a method I developed to convert file geodatabase based data into open source data. This open source data can be placed in a location for syncing and viewing by many QGIS viewers.
Note: In this example I use ArcGIS Pro Desktop 2.3 trial version and QGIS 3.6. Also, I have successfully performed this method with ArcMap 10.1 and older versions of QGIS 3.
Convert File Geodatabase into shapefiles the preserve coded domains
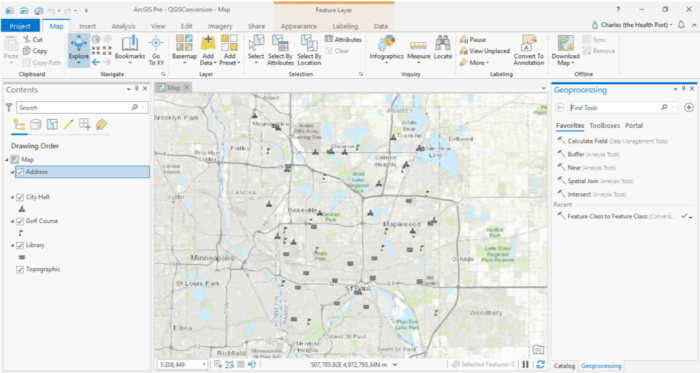
In this sample, I have an ArcPro Desktop map with four layers stored in a sample file geodatabase. I obtained this geodatabase from open Ramsey County, Minnesota data. The 4 layers are Address, City Hall, Golf Courses and Library.

Examining the data further, the layer Address has coded domains that need to be preserved:

The first step in setting up a QGIS version is to create a directory to store all of the data that will be needed to load the QGIS map. This includes the QGS file, the symbols, and the shapefiles.

Next use the feature class to feature class tool to convert the geodatabase layers into shapefiles.
Note: It is important to preserve the Coordinate Systemand Coded Domainsusing the method below so they appear correct in the QGS document.
Step 1:

Step 2:

Step 3:

Step 4:

Now that shapefiles have been created out of the file geodatabase layers, load them into QGIS.

Set up the attribute table so that coded domain fields are visible on the Address Layer:
First, open the attribute table by right clicking on the layer and left clicking on open attribute table.

Second, right click on the columns to organize columns.

Third, replace the columns with the columns that actually have the coded values.

Your final table will show only coded domain values.

Having successfully imported your layers and their values into QGIS, it’s time to convert symbology over.
Convert Symbology to .SVG Format to be loaded into QGIS Map
To use point symbology in QGIS, it will need to be converted into .svg format.
Note: In this example Inkscape is used to convert .png files into .svg format. Inkscape accepts several types of formats, so the symbols created are almost limitless. It’s also important for the map creator to be very careful with symbology to avoid copyright issue.
Open the .png file in Inkscape.

Save the file to the svg folder in the directory as svg format.

In your QGIS map load the symbol for the corresponding label and size it appropriately:
Right click on the target layer and left click on properties.

In the layer properties menu, select the symbology tab. From the symbology tab, use the drop down menu to change simple marker to svg marker.
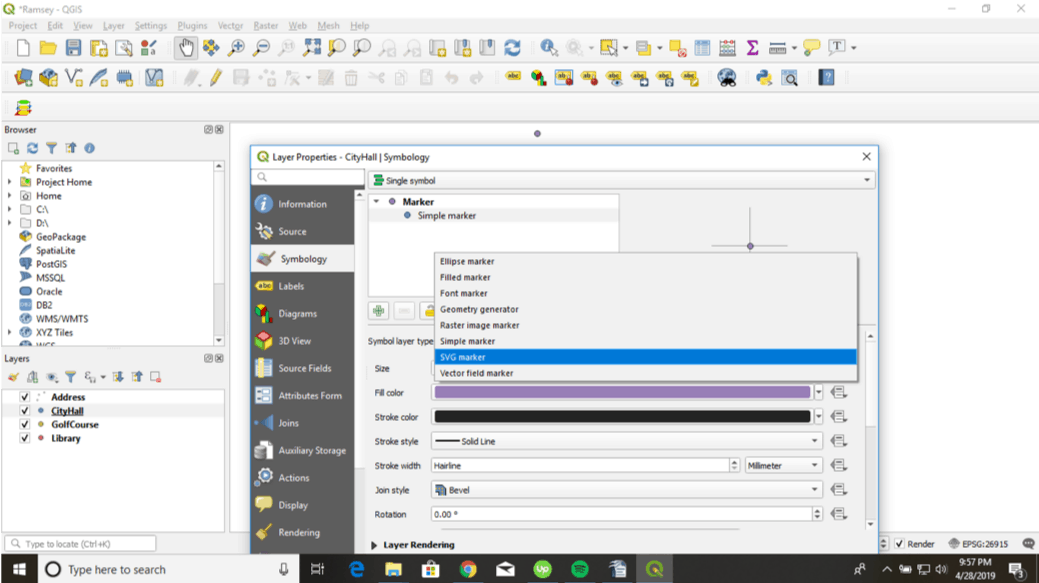
Once you have changed the selection, scroll to the bottom and choose a svg marker from file.

Select the svg file created earlier.

Once this process has been repeated and combined for all layers, a QGIS near duplicate of an Esri map has been created.
Note: Basic roads layer was added to make QGIS map look even more like original Esri map.

Set up directory to be synchronized with other directories
To take full advantage of the effect of the new QGIS map created in steps A and B, one can set up the new QGIS directory to be synchronized with other directories.
To accomplish this, use a software called FreeFileSync.
FreeFileSync is an open source program that will duplicate any directory to match another file directory, as well as many other features not covered in this article.
Note: In this example, I used 2 folders on my own computer but it can be done across any server location.
Once the FreeFileSync has been opened, choose the parentdirectory on the left hand side using the left handed browse button. This is the directory that will be edited.


Select the right-hand browse button to select a child directory. This will be the directory on which the user working with the local machine views the data. This way edits will never, unintentionally, override the original data.


Select the option to mirror the child directory to the parent directory. Click on the right arrow next to the Synchronize button.

Notice under the synchronize button it says mirror.

To run the synchronization, left click the Compare button then left click the Synchronize button.


Observe that FreeFileSync detected the edit made to the City Hall layer in the parent directory, then copied it to the child directory.
Automatic Synchronization
FreeFileSync also downloads a program called RealTimeSync which allows automatic synchronization in FreeFileSync.
Note: There appears to be two main limitations with this function. First, shutting down the computer or server forces realtimesync to be reset. Second, RealTimeSync only allows for set up synchronization in seconds, which may be too often for most small GIS operations.
You will save your synchronization in FreeFileSync as a batch file (.ffs).
Under the configuration heading, select save as batch job.

Correctly saved, the file will appear in the left hand column.

Close freefilesync and open realtimesync.
In realtimesync, click open from the file drop down menu.

Now that the batch file (.ffs) is opened, choose how often sync is needed and click start to set up real time synchronization.

Conclusion
In this article, I have outlined a three-part method to convert an Esri-based GIS map to open source format that can be synchronized with several directories for end users to see. While the method I highlighted above incorporates the ArcGIS Pro Desktop table to table tool, Inkscape, and FreeFileSync, the brilliance of this method is that any of these three tasks can be accomplished in a myriad of ways to get the same result. I look forward to seeing how others use my method to achieve open-source GIS.
About the Author
Charles Altendorf graduated from the University of Kentucky with a degree in Geography in 2011. I have been working professionally in GIS for about 6 years now: My first position was a full-time GIS Intern for the Bluegrass Area Development District, My second position was with a surveying company that was a subcontractor for natural gas companies, My last position before moving back to Kentucky was with an engineering firm responsible for collecting, digitizing and creating final prints for several fiber companies and in my current position, I look forward to using my expertise in GIS to serve the Hardin County Water District No. 1 in any way possible.